An Exercise in Metering and Dynamic Range
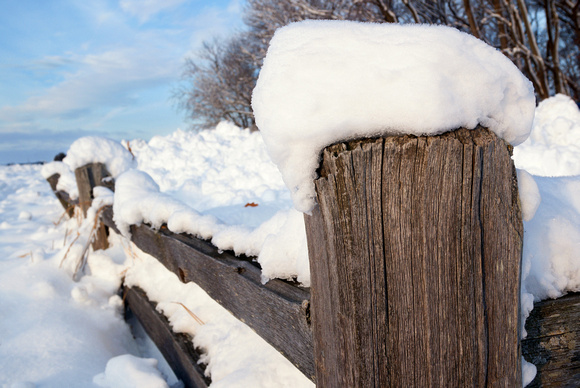

Image: Nikon D200, Nikkor 24-85 f/3.5 lens at 24mm, ISO 200, 1/60 @ f/9, AWB, hand-held
A recent trip after a snow storm to what Horiconians call DNR Hill was a perfect way to practice some metering and snow exposures in what would normally be a challenging environment -- lots of bright white reflective snow.
The time was late afternoon. I had my D200 and Sekonic 358 light meter. When looking for a subject, I considered the wood fence post for its texture and character, and contrast with an otherwise white scene. The metering would be challenging with a matrix mode with all the white snow fooling the system into under exposure. Even in spot mode it would have required precise measurement and placement of the snow into the correct zone. To make it simple, I pointed the Sekonic's lumisphere toward the sun and took a reading. I knew metering the brightest side would protect the highlights and enable the rest of the tones to fall into place.
I put the meter's settings into the camera in manual mode. One snap and I checked the histogram to ensure the snow was placed far to the right without clipping, and it was dead on. No guessing, no bracketing, no fiddling with compensation. I knew the combination of incident metering with checking the histogram guaranteed me a rich negative, and with the settings locked in, I could recompose and shoot without having to worry about whether the exposure would change, like it would if I were using matrix metering. It didn't matter where I pointed the camera, other than at the sun; the exposure would be correct.
The negative is just the blueprint for the final print. It must be processed for contrast, color, sharpness, cropping and lens corrections. And in this case the image was flipped horizontally to maximize interest in the wood post. This is congruent with the rule of leading lines and rule of thirds. Had I kept the image in original orientation with the post on the left, the eye would be continually led out of the image to the right via the lines of the fence (see below). Now it stops at the post, scans the fence and sky, and explores the little patch of fungus at the lower right. The pattern repeats and the eye stays in the image.
The only processing done in Lightroom was detail and lens corrections. The image then moved to Perfectly Clear for auto toning, which amazingly did in a minute what would've taken extensive fiddling manually. Then it went into CS6 essentially just for greater control over Color Efex Pro adjustments, which were polarization, slight color cast removal, saturation, contrast. A little dodging was done in the lower right corner. Lightroom exported the JPEG directly to my website with the watermark.
The key to making this image started with composition and quality of light. It wasn't ideal fantasy light, but it was soft enough, starting to color, and the sun was behind clouds, and had I waited any longer for the light to yellow further, it simply would've become too soft to create any contrast in the snow. I even knew I would be flipping the image in post. The second key was incident metering of the light falling on the scene, not reflected light, for correct exposure, enabling the camera to capture the full range of values without loss of detail in the highlights or shadows. Notice that even in the brightest areas of snow there's fine detail and you can still see crystals. Lastly, the image was processed to bring the full photographic qualities out of the negative.
As always, if you want to know more about the image or photography, just email me.
Images for Study
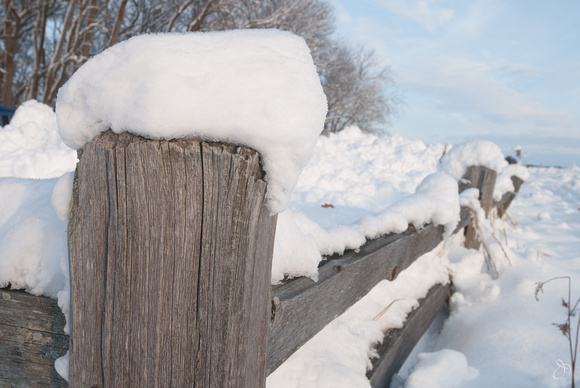
I think you'll agree the original negative is high quality. The histogram would show most of the data is in the first two stops of highlights, and none is in the shadows. It takes software to enhance those highlights and shadows and shape the light to bring the eye where I want it. Also some distracting elements were removed, and the image was flipped horizontally. But without a quality negative, you'll be introducing extreme noise, shifting colors, destroying highlights and running into all sorts of problems that are impossible to correct or would take a lot of time to fix. Don't think that great images happen in the camera. They begin in the camera, but they need development, a fact Ansel Adams was passionate about. You'll probably agree it didn't take much to get from here to the final image.
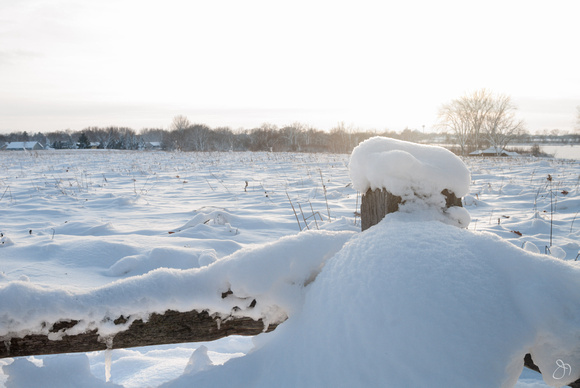
This illustrates the limits of the camera's dynamic range. Even with a light meter pointed at the sun, you can only measure the light falling on the scene. The sun itself is millions of times brighter than anything else in the scene and therefore can never be brought into the dynamic range of the sensor. It will always be blown out. The rest of the scene is properly exposed, but the sun is way outside the 2.5 stops of light the camera can record up and down from the average. If you could expose properly for the sun, everything else would be black because the differences in brightness are too great for any camera to record. So, the light meter doesn't automatically mean a great image. You still have to understand the limits of the camera. The solution to this problem would be to take a high dynamic range image with three exposures -- one for the highlights, midtones and shadows. Then combine them in software. You could also choose to sacrifice the sky in the composition or lose details in the highlights or shadows, depending on what your subject is.

One of the solutions is to compose without the sky, or crop it out. In this image, you get a better sense of the light bouncing off the snow and illuminating the fence rail and icicle, and you get a beautiful opening of light in the lower right. I would also use the post to block the sun and even attempt a star effect with a small aperture. It's still important to meter toward the sun, which is the highlight side of the scene. That enables the shadows to fall below the highlights. If I had metered toward the camera, the shadow side of the scene, I would have overexposed everything, pushing the shadows closer to the highlight range and blowing out the highlights.

Comments